BREAKING

Friday, 18 October 2013

Download SSC Combine Higher Secondary Level (CHSL) 2013 Admit Card

Download SSC Combine Higher Secondary Level (CHS) 2013 Admit Card

Download Staff Selection Commission (SSC) Combine Higher Secondary Level (CHSL)  2013 Examination Admit Card for Lower Division clerk (LDC) and Data Entry Operator (DEO) posts. The Region wise link is given in the below chart.

Dates of  Exams are 20.10.2013, 27.10.2013 and 10.11.2013.


State/UT


Regions & 
 Date of Exam 


Download Link


Web Portal


Rajasthan, Delhi, Uttarakhand
North Region


Maharashtra, Gujrat,Goa

Western Region (20.10.2013 and 27.10.2013)


Madhya Pradesh, Chhattisgarh

MP Sub-Region


Click here


West Bengal, Orrisa, Jharkhand, A&N Island, Sikkim
Eastern Region (27.10.2013 and 10.11.2013)


Assam, Arunachal Pradesh, Manipur, Meghalaya, Tripura, Nagaland, Mizoram


North Eastern Region (10.11.2013)


Click here


Andhra Pradesh, Punduchery, Tamilnadu

Southern Region


Click here

Karnataka, Kerla

KKR region (10.11.2013)

Click here

Hariyana, Punjab, J&K, Himachal Pradesh
North Western Sub-Region
(27.10.2013 and 10.11.2013)


Uttar Pradesh & Bihar
Central Region (20.10.2013, 27.10.2013 and 10.11.2013)


How To Take Screenshots With Nokia Lumia Lumia 520, 620, 720, 820, 822, 920, 1020

How To Take Screenshots With Nokia Lumia Lumia 520, 620, 720, 820, 822, 920, 1020

To take a screen capture or screenshot with your Nokia Lumia range of phones Nokia Lumia 520, 620, 720, 820, 822, 925, 928, 1020, etc. phone. These phones are based on windows os by Microsoft Corporation. Taking a screenshot is very easy and don't need any application.

How To Take screenshot On Nokia Lumia Phone?

  • Go to your desire screen.
  • Press the START and POWER button together.
  • Then browse your photo library and check SCREENSHOT folder.
  • Your task is complete now :)
How To Take Screenshots With Nokia Lumia Lumia 520, 620, 720, 820, 822, 920, 1020

Paygot.com is a Fraud E-currency Excahnger Site

Paygot.com is a Fraud E-currency Excahnger Site

Dear my friends, I'm writing this post against Paygot.com. It is a German based money exchange company, supports all major e-currencies. They are scamming peoples and stealing their money. 

      I was recently scammed out of $95 from Paygot. I order an exchange from Egopay to Paypal. They said instant processing. But days passed , they sent me nothing in my Paypal. I tried to call them, but the given German phone number was wrong. I mailed them. Nothing works. They f**ked my 95 dollars.

   So Beware of Paygot.com. They are fake. I have attach an image as a proof that I send them money.

Paygot.com is a Fraud E-currency Excahnger Site

Turn off your Laptop screen in a single click

Turn off your Laptop screen in a single click

Today I'm shearing a tool, that helps you to turn off your laptop monitor in a single click. When your are downloading a big file, you can turn off your screen. Your download will continue. It helps you saving a little amount of electricity. So you need to download a third party software, called Dark – Turn Off Monitor. It is little open source.net application to turn off your laptop screen by double clicking a Notify Icon.

So download the software Click Here. It supports in all OS. I'm using it in my Windows 8.

Unzip the setup file and install it.

After installing you'll get an icon in your notification area/bar. Just double click on it to turn off your screen. Follow below image.

Turn off your Laptop screen in a single click

How To Remove Subscribe to: Posts (Atom) Message in Blogger

  • How To Remove Subscribe to: Posts (Atom) Message in Blogger

    Do you want to remove Subscribe to: Posts (Atom) message from your blog. Some blogger template shows Subscribe to: Posts (Atom) link below post. It covers an extra space in your blog and its time for removal. So please follow the steps..


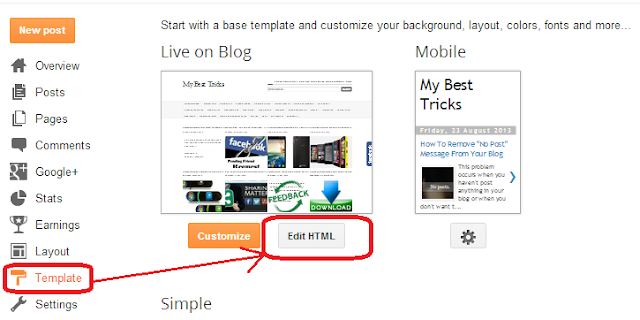
    1. First go to your blogger home and click on your Template.
    2. Now click on Edit HTML. Like below image.

      How To Remove Subscribe to: Posts (Atom) Message in Blogger

    3. Now search for below code(Use CTRL+F).

    4.  <b:include data='feedLinks' name='feedLinksBody'/>
    5. Now just remove the code line from your template. Save your template.
    How To Remove Subscribe to: Posts (Atom) Message in Blogger

    **This will removes the Subscribe to: Posts (Atom) message from your blog. If you need any help please comment below.


  • How To Remove "No Post" Message From Your Blog

    Posted:Fri, 23 Aug 2013 10:14:00 +0000
    How To Remove "No Post" Message From Your Blog

    This problem occurs when you haven't post anything in your blog or when you don't want to show any post in your blogger homepage. You can remove this message by a simple CSS trick. You need to add some CSS code in your blog template. Just follow the steps down...


    1. Go to your blogger home and click Template
    2. Then click Customize.
    3. Then click Advance tab, scroll down and click Add CSS.
    4. Now add the below code in the CSS text box.

      .status-msg-wrap
      {
      display: none;
       }
    5. Now click Apply to Blog. Check your blog, 'No posts' message box should now have disappeared .
    How To Remove "No Post" Message From Your Blog


    **If you already have codes in your CSS text box, just place the code after your previous code. If you like my post please comment.

Where can I see friend requests I have sent?


Now you can review your friend request that you have send in Facebook. You can see that in your Facebook activity log. Activity log display when you sent someone a friendship request. You can also see when you unfriend someone in log activity. Just follow steps below to review your pending friendship request.


  1. Click the privacy shortcut in the upper-right corner in your Facebook profile. Then click 'See More Setting'
    Where can I see friend requests I have sent?
    Where can I see friend requests I have sent?


  2. After that click 'Use Activity Log'

    Where can I see friend requests I have sent?
  3. Then on Activity Log click on 'More' and then 'Friends'

    Where can I see friend requests I have sent?

  4. Now you can see your pending friendship requests.

    Where can I see friend requests I have sent?

  5. Please comment if you like my post. :)

How To Create Bootable USB using PowerISO

How To Create Bootable USB using PowerISO

Hello friends, My name is aladin and  I am the new owner of this blog. Now we can make a bootable USB drive using Power ISO. Sometime we are not able to format our computer with bootable DVD or CD. If you don't have a CD Drive, you can use a bootable USB flash drive. Let discuss how we should make a bootable USB.

  Create Bootable USB Flash Drive Using:
  1. Start PowerISO (Download here).
  2. Insert the USB drive you intend to boot from.
  3. Choose the menu "Tools > Create Bootable USB Drive". The "Create Bootable USB Drive" dialog will popup. If you are using Windows Vista or Windows 7 operating system, you need confirm the UAC dialog to continue.
  4. Now select the "Source Image File" and open the iso file of Windows XP or Windows 7 or Windows 8.
  5. Select the correct USB drive from the "Destination USB Drive" list if multiple USB drives are connected to the computer.
    How To Create Bootable USB using PowerISO

  6. Click "Start" button to start creating windows 7 bootable USB drive.

How To Add Read More Button To Blogger Post

How To Add Read More Button To Blogger Post


Most of new blogger searching for cool read more buttons. Even somebody don't know how to add a read more button and replace with the read more text link. To show button in your post you need to summarize your post using "insert jump break" tool at post edit section. And you have to replace image link with jump text in your blogger template. How to do this? Follow all steps.


Get Your Read More Button ~ Easy Steps:
  • Go to Blogger Dashboard >> Template >> Edit Template.
  • Check ''Expand Widget Template".
  • Find the below codes. (Use Ctrl+F)
     <data:post.jumpText/>

  • Now replace the code by the below code.
     <img src="your-image-url"/>

  • Change your-image-url with below image. [Right click on image and copy the image url]
  • Now Save your template.

Some Stylish Read More Buttons:

How To Add Read More Button To Blogger Post
 How To Add Read More Button To Blogger PostHow To Add Read More Button To Blogger PostHow To Add Read More Button To Blogger Post

How To Add Read More Button To Blogger Post
 How To Add Read More Button To Blogger PostHow To Add Read More Button To Blogger PostHow To Add Read More Button To Blogger PostHow To Add Read More Button To Blogger Post

Show Read More Button on your post~

Use "Insert Break Jump" tool where you want to show your button. It may after 30-60 words on behalf your post length.

How To Add Read More Button To Blogger Post

Do Comments & Keep Visit :)

Thursday, 21 February 2013

How To Remove Locked Widget From Blogger Layout


Today I am sharing a small solution which most of  new blogger friends facing. Sometime we update our blog template for better looking. Then we see some locked widget without remove option in blog layout. The idea is just change the lock mode form true to false by editing at template section. We can also remove the Attribution gadget("Powered By Blogger") using this method.

Widget in your blog layout

  • Go to your blogger Dashboard >> Layout. 
  • To edit the widget just click edit at there.


Lock & Unlock Widget

  • I made a screenshots of above two types of widget. The locked widget don't have remove button.


How to unlock it?

  • Just go to your layout and click edit to get the widget id. You can get the widget id in your browser address bar.

Copy the widget id from widget address bar

  • Now go to Template >> Edit Template. And find the above code.[Use Ctrl+F to find].
  • You will get a line like this <b:widget id='HTML4' locked='true' title='Recent Posts' type='HTML'/> 
  • Change the locked='false'
  • Save your template.

Final step:


  • Now you can easily remove it from your layout. Now the widget shows remove button in your layout.
  • You did all successfully.

Tuesday, 12 February 2013

Best Free Data Recovery Software For Windows of 2013

Best Free Data Recovery Software For Windows of 2013

Have you completely deleted your an important file from your PC? Then you are not in danger. Cause you heard about the Data Recovery Software - which recover your lost data within small time. And you have to buy the software for premium service. No matter, forgot those product. I search in Google about free service. and made a list of free data recovery software. If you have deleted any file permanently from your computer and now you want to recover that file, you have to use any one from below list.

List of top 5 free data recovery tools


Accidentally deleted an important file? Lost something important when your computer crashed? No problem! Recuva recovers files deleted from your Windows computer, Recycle Bin, digital camera card, or MP3 player. And it's free! Get Recuva.

After data loss, please stop using the bad drive any more. And do not waste time and money on other software, immediately download EaseUS Data Recovery Wizard, save and then install it on a drive other than the one on which your files were lost. Get EaseUS Data Recovery Wizard Free

Pandora Recovery

Pandora Recovery Wizard is a free tool that helps you locate and recover lost or deleted files from your system. You can browse for files in the main window's tree view, but the easiest way to recover files is with Pandora's wizard, which holds users' hands at every step of the critical process. It can recover deleted files, provided they haven't been severely damaged or securely overwritten.Get Pandora Recovery.


Smart Recovery is an application that is especially designed to lend you a hand when trying to get back photos and audio files you lost by accidentally deleting from your computer or from any removable drives.
Just like all other recovery software solutions on the market, this utility needs to scan the computer for removed files, trying to restore every single bit of lost data.Get Smart Recovery.

5. MiniTool Power Data Recovery

MiniTool Power Data Recovery

Unlike other data recovery software, MiniTool Power Data Recovery is an all in one data recovery software for home and business users. It can recover deleted data from the Windows Recycle Bin, restore lost data, even if the partition is formatted or deleted, restore data from a corrupted hard drive, virus infection, unexpected system shutdown or software failure.Get MiniTool.


Thanks for visit. Please Comment !!

 
Copyright © 2013 My Best Tricks
Design by RoadStar Rakesh |
    Twitter Facebook Google Plus YouTube