BREAKING
Showing posts with label Blogger Tips. Show all posts

Friday, 18 October 2013

How To Remove Subscribe to: Posts (Atom) Message in Blogger

  • How To Remove Subscribe to: Posts (Atom) Message in Blogger

    Do you want to remove Subscribe to: Posts (Atom) message from your blog. Some blogger template shows Subscribe to: Posts (Atom) link below post. It covers an extra space in your blog and its time for removal. So please follow the steps..


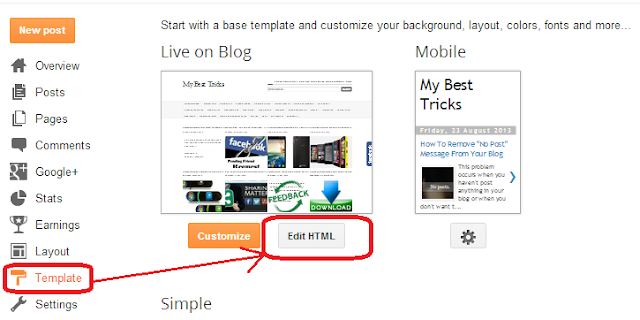
    1. First go to your blogger home and click on your Template.
    2. Now click on Edit HTML. Like below image.
      How To Remove Subscribe to: Posts (Atom) Message in Blogger

    3. Now search for below code(Use CTRL+F).

    4.  <b:include data='feedLinks' name='feedLinksBody'/>
    5. Now just remove the code line from your template. Save your template.
    How To Remove Subscribe to: Posts (Atom) Message in Blogger

    **This will removes the Subscribe to: Posts (Atom) message from your blog. If you need any help please comment below.


  • How To Remove "No Post" Message From Your Blog

    Posted:Fri, 23 Aug 2013 10:14:00 +0000
    How To Remove "No Post" Message From Your Blog

    This problem occurs when you haven't post anything in your blog or when you don't want to show any post in your blogger homepage. You can remove this message by a simple CSS trick. You need to add some CSS code in your blog template. Just follow the steps down...


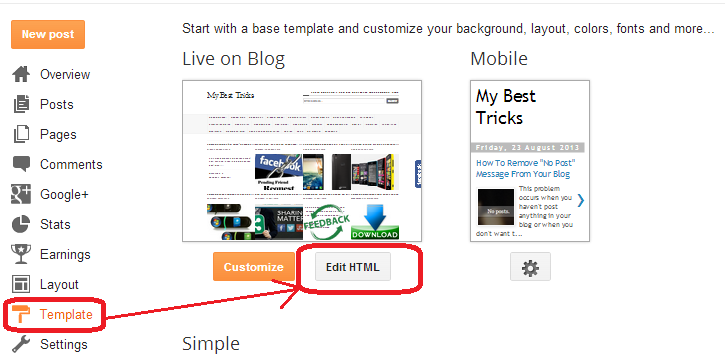
    1. Go to your blogger home and click Template
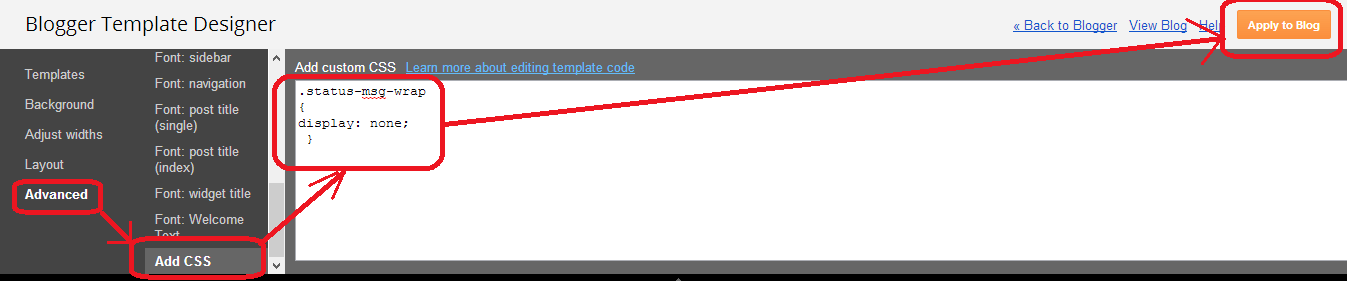
    2. Then click Customize.
    3. Then click Advance tab, scroll down and click Add CSS.
    4. Now add the below code in the CSS text box.

      .status-msg-wrap
      {
      display: none;
       }
    5. Now click Apply to Blog. Check your blog, 'No posts' message box should now have disappeared .
    How To Remove "No Post" Message From Your Blog


    **If you already have codes in your CSS text box, just place the code after your previous code. If you like my post please comment.

Thursday, 21 February 2013

How To Remove Locked Widget From Blogger Layout


Today I am sharing a small solution which most of  new blogger friends facing. Sometime we update our blog template for better looking. Then we see some locked widget without remove option in blog layout. The idea is just change the lock mode form true to false by editing at template section. We can also remove the Attribution gadget("Powered By Blogger") using this method.

Widget in your blog layout

  • Go to your blogger Dashboard >> Layout. 
  • To edit the widget just click edit at there.


Lock & Unlock Widget

  • I made a screenshots of above two types of widget. The locked widget don't have remove button.


How to unlock it?

  • Just go to your layout and click edit to get the widget id. You can get the widget id in your browser address bar.

Copy the widget id from widget address bar

  • Now go to Template >> Edit Template. And find the above code.[Use Ctrl+F to find].
  • You will get a line like this <b:widget id='HTML4' locked='true' title='Recent Posts' type='HTML'/> 
  • Change the locked='false'
  • Save your template.

Final step:


  • Now you can easily remove it from your layout. Now the widget shows remove button in your layout.
  • You did all successfully.

Saturday, 9 February 2013

How to Index Your Blog Using Google Webmaster Tools


Google provides some additional tools or features when you verify your blog with Google Webmaster Tools. It provides you detailed reports about your blog pages, page visibility, crawls, indexed pages. I am describing only about indexing your blog pages in Google Search. You can easily do it by adding a sitemap to webmaster section. Remember that you can index your pages after adding your blog in Google FeedBurner (RSS/Atom)

First Add Your Site To Webmaster

  • Sign into Google Webmaster Tools with your Google Account.
  • Click the Add a site button, and type the URL of the site you want to add. Make sure you type the entire URL, such as http://www.myblog.blogspot.com/
  • Click Continue. The Site verification page opens
  • Select the verification method you want, and follow the instructions.

Index Your Pages ~ Add Sitemap 

  • In your Google Webmaster Dashboard click on Sitemaps.
  • Then click ADD/TEST SITEMAP and add the below code in the box.
  • If your blog has below 500 posts then add this code:
    atom.xml?redirect=false&start-index=1&max-results=500
  • If you have more than 500 post but less than 1000. Use two sitemap.
    atom.xml?redirect=false&start-index=1&max-results=500
    atom.xml?redirect=false&start-index=501&max-results=1000
  • Change the start-index= [value] and max-results=[value] if you have more than 1000 posts.

My Final Words~

     This is a very easy method for adding and indexing your blog in Google. You are using Blogger as your blogging platform. Need Help or Suggestion?? Contact Us for any Blogger related help. We will try to solve your problem as soon as possible. Thanking You. Rakesh Ali.

Friday, 25 January 2013

Animated Sliding Recent Post Widget For Blogger


If you need a professional look of your blog, you must place an animated Recent Posts widget in your sidebar. As a good designer you must have a stylish blog. So your visitors are easily attracted. Its is very easy to add this widget. You have to put a code in HTML/JavaScripts box. Demo for this widget you can see in this blog.


Add This Widget To Blogger

  1.  First log in to your blogger account. Go to Dashboard >> Layout >> Add a Gadget >> HTML/JavaScript.
  2. Now put the below code into HTML/JavaScript box.

    <script src="http://ajax.googleapis.com/ajax/libs/jquery/1.3.2/jquery.min.js" type="text/javascript"></script>
    <style type="text/css" media="screen">
    <!--
    #spylist {
    overflow:hidden;
    margin-top:5px;
    padding:0px 0px;
    height:350px;
    }
    #spylist ul{
    width:220px;
    overflow:hidden;
    list-style-type: none;
    padding: 0px 0px;
    margin:0px 0px;
    }
    #spylist li {
    width:208px;
    padding: 5px 5px;
    margin:0px 0px 5px 0px;
    list-style-type:none;
    float:none;
    height:70px;
    overflow: hidden;
    background:#fff url(https://blogger.googleusercontent.com/img/b/R29vZ2xl/AVvXsEgNOoxshJa_pwFInGlH8-S5zmIZzQIfyQL11kQ5Z4fT_aGQR44TFkKKOTvZW0O8UsMxb86CU_tAKb-heYKAyJV1mgud8_T91K7xQopidv-7qJ1XugYdeb48X8W3Ts9dom7uwNpZ1fE2zNfd/s1600/bdlab-blogspot-com.jpg) repeat-x;
    border:1px solid #ddd;
    }
    #spylist li a {
    text-decoration:none;
    color:#4B545B;
    font-size:11px;
    height:18px;
    overflow:hidden;
    margin:0px 0px;
    padding:0px 0px 2px 0px;
    }
    #spylist li img {
    float:left;
    margin-right:5px;
    background:#EFEFEF;
    border:0;
    }
    .spydate{
    overflow:hidden;
    font-size:10px;
    color:#0284C2;
    padding:2px 0px;
    margin:1px 0px 0px 0px;
    height:15px;
    font-family:Tahoma,Arial,verdana, sans-serif;

    }
    .spycomment{
    overflow:hidden;
    font-family:Tahoma,Arial,verdana, sans-serif;
    font-size:10px;
    color:#262B2F;
    padding:0px 0px;
    margin:0px 0px;

    }
    -->
    </style>
    <script language='JavaScript'>
    imgr = new Array();
    imgr[0] = "https://blogger.googleusercontent.com/img/b/R29vZ2xl/AVvXsEh3zv60VlYYan7OHb7TEBPiSNrwAG_E-JHsoQrZbcnDlGcrQW7KcErAlPwweHRzEOXlDi1Htu9C8kKYve231pcEuHZQFnD2Yq_AvMazH7zgpMFTBJ9IXLvGwGRkg-pApyFhfxeyTeJH5qQ/s400/noimage.png";
    imgr[1] = "https://blogger.googleusercontent.com/img/b/R29vZ2xl/AVvXsEh3zv60VlYYan7OHb7TEBPiSNrwAG_E-JHsoQrZbcnDlGcrQW7KcErAlPwweHRzEOXlDi1Htu9C8kKYve231pcEuHZQFnD2Yq_AvMazH7zgpMFTBJ9IXLvGwGRkg-pApyFhfxeyTeJH5qQ/s400/noimage.png";
    imgr[2] = "https://blogger.googleusercontent.com/img/b/R29vZ2xl/AVvXsEh3zv60VlYYan7OHb7TEBPiSNrwAG_E-JHsoQrZbcnDlGcrQW7KcErAlPwweHRzEOXlDi1Htu9C8kKYve231pcEuHZQFnD2Yq_AvMazH7zgpMFTBJ9IXLvGwGRkg-pApyFhfxeyTeJH5qQ/s400/noimage.png";
    imgr[3] = "https://blogger.googleusercontent.com/img/b/R29vZ2xl/AVvXsEh3zv60VlYYan7OHb7TEBPiSNrwAG_E-JHsoQrZbcnDlGcrQW7KcErAlPwweHRzEOXlDi1Htu9C8kKYve231pcEuHZQFnD2Yq_AvMazH7zgpMFTBJ9IXLvGwGRkg-pApyFhfxeyTeJH5qQ/s400/noimage.png";
    imgr[4] = "https://blogger.googleusercontent.com/img/b/R29vZ2xl/AVvXsEh3zv60VlYYan7OHb7TEBPiSNrwAG_E-JHsoQrZbcnDlGcrQW7KcErAlPwweHRzEOXlDi1Htu9C8kKYve231pcEuHZQFnD2Yq_AvMazH7zgpMFTBJ9IXLvGwGRkg-pApyFhfxeyTeJH5qQ/s400/noimage.png";
    showRandomImg = true;
    boxwidth = 255;
    cellspacing = 6;
    borderColor = "#232c35";
    bgTD = "#000000";
    thumbwidth = 70;
    thumbheight = 70;
    fntsize = 12;
    acolor = "#666";
    aBold = true;
    icon = " ";
    text = "comments";
    showPostDate = true;
    summaryPost = 40;
    summaryFontsize = 10;
    summaryColor = "#666";
    icon2 = " ";
    numposts = 10;
    home_page = "
    http://www.mybesttricks.com/";
    limitspy=5
    intervalspy=4000
    </script>
    <div id="spylist">
    <script src='http://safir85.ucoz.com/bdlab-blogspot/24work/recent-posts/animated_recent_posts.js' type='text/javascript'></script>
    </div>
  3. In above code just change http://www.mybesttricks.com/ [the blue line] with your blog link or url. 

Need Help? ~ Comment Here

Thursday, 24 January 2013

Add Stylish Social Icons With Hover Effect To Blogger

Add Stylish Social Icons With Hover Effect To Blogger
       Social Icons widget is a very effective to take attention of your visitors. It help you to get more traffic from various social networking sites. By adding your social account links to your blog, your visitor can easily connect you and your blog updates. I will give stylish icon pack with Hover effect. The Social Icon Pack Include.


This widget Include

  • Google Plus Icon.
  • Twitter Icon.
  • Facebook Icon.
  • RSS Icon.
  • Email Icon.

How to add it to blogger

  1. First go to blogger Dashboard >> Template >> Edit HTML.
  2. Now Search for the code below [Use Ctrl+F].

    ]]></b:skin>
  3. And  paste the below code just above ]]></b:skin>.

    /* Social Widget by my best tricks*/

    #subscribe2 {
    background:#f3f3f3;
    border: 1px solid #ECEDE8;
    font-size: 90%;
    margin: 0 0 15px 0;
    padding: 7px 5px 3px 5px;
    width: 288px;
    }
    .subscribe-icons2 {
    margin: 0 auto;
    width: 286px; background: #f7f7f7;
    }
    .subscribe-icons2 li { -moz-border-radius:6px;
    display: inline;
    float: left;
    font-size: 11px;
    margin: 0 2px 10px 2px;
    width: 52px;
    text-align: center;
    }
    .subscribe-icons2 a {
    color: #444 !important;
    display: block;
    padding: 56px 0 2px;
    -moz-transition: all .2s ease-out;
    -webkit-transition: all .2s ease-out;
    }
    .subscribe-icons2 a:hover { -moz-border-radius:6px;
    -moz-box-shadow: 0 2px 4px hsla(0,0%,0%,.35);
    -webkit-box-shadow: 0 2px 4px hsla(0,0%,0%,.35);
    color: #369 !important;
    text-decoration: none;
    }
    .subscribe-icons2 .subscribe-youtube a {
    background: url(http://karrersimpson.com/obituaries/tomchuk-helen-1575/icon64_googleplus.png) center top no-repeat;
    }
    .subscribe-icons2 .subscribe-twitter a {
    background: url(http://karrersimpson.com/obituaries/tomchuk-helen-1575/icon64_twittert.png) center top no-repeat;
    }
    .subscribe-icons2 .subscribe-facebook a {
    background: url(http://karrersimpson.com/obituaries/tomchuk-helen-1575/icon64_facebook.png) center top no-repeat;
    }
    .subscribe-icons2 .subscribe-rss a {
    background: url(http://karrersimpson.com/obituaries/tomchuk-helen-1575/icon64_rss.png) center top no-repeat;
    }
    .subscribe-icons2 .subscribe-email a {
    background: url(https://blogger.googleusercontent.com/img/b/R29vZ2xl/AVvXsEjhtuIZNhwfr5Jbz0OZv5JH82159cVpmeo19yTYN8MsDNETPQR_hLhJ_-8kXzap3OPtnORdjaJfXp5n_44FBjZ4BP2kYkVMxCnp2h8r-OzC8RlRlK7R-Bbs31hXkZs2fNmCIRcg-bPk2mw/s320/gmail-email+21.png) center top no-repeat;
    }
4. Now add this code in your sidebar. Go to Layout >> Add a Gadget >> HTML/JavaScript.

<div class='subscribe2'>

<ul>
<li><a target="_blank" rel="nofollow" href="https://plus.google.com/
Your_Google+_ID">Google+</a></li>
<li><a target="_blank" rel="nofollow" href="http://twitter.com/
mybesttricks">Twitter</a></li>
<li><a target="_blank" rel="nofollow" href="http://www.facebook.com/
mybesttricks">Facebook</a></li>
<li><a target="_blank" rel="nofollow" href="http://feeds.feedburner.com/
mybesttricks">RSS</a></li>
<li><a target="_blank" rel="nofollow" href="http://feedburner.google.com/fb/a/mailverify?uri=
mybesttricks&amp;loc=en_US"> Email</a></li>

</ul> <!--end .subscribe-icons-->

<div/>

</div>
    • Change Your_Google+_ID with your own.
    • Change mybesttricks with your own Facebook, Twitter and FeedBurner Username.

You have any problem, please comment.

Thursday, 10 January 2013

How To Add Meta Tags To Your Blogger Blog


              A meta tag contains meta data about the web page it is in. A meta tag will not affect the way the page looks, and in most cases won't even be seen by the person reading the web page. But meta data can contain useful information about the page that programs and web spiders can use.


Why use Meta tags?

meta description of my best tricks
Meta Description of this blog
       Adding meta tags is very important if you want to get some good traffic from search engines like google,yahoo,msn,etc,especially the meta description part is the most important one. This is an important factor in Search Engine Optimization (SEO). Meta tags allows search engines to index your blog pages more accurately and correctly.


How to add Meta tags to Blogger?


  • Go to your blogger Dashboard >> Template >> Edit HTML.

    How To Add Meta Tags To Your Blogger Blog

  • Find the following code.(Use Ctrl+F to find).


<b:include data='blog' name='all-head-content'/>
  • Now add below codes just after the above code.
<meta content='DESCRIPTION HERE' name='description'/>
<meta content='KEYWORDS HERE' name='keywords'/>
<meta content='AUTHOR NAME' name='author'/>

    Make change the blue lines as follow
DESCRIPTION HERE - With your shorrt blog description
KEYWORDS-  Write keywords related to your blog
AUTHOR NAME - Write your own Name.
  • Finally Save your template. 

Rate & Comment!!!

Wednesday, 9 January 2013

Add BigRock Domain Name For Blogger Custom Domain

Add BigRock Domain Name For Blogger Custom Domain

       BigRock is the most popular Domain Registration & Web hosting company in India. You can purchase    domain name starts from Rs. 99(INR). If you already purchase a domain name from BigRock and you want to convert your blogspot to new custom domain then follow this tutorial. I am also a Bigrock customer and also faced problem during setting. This Tutorial will teach you How to add your BigRock domain to a Blogspot blog.


How to add Bigrock domain to your blogger blog??


1.  First Go to your Bigrock Account  and Log in to your BigRock Account.

Add BigRock Domain Name For Blogger Custom Domain

2. Go to My Account >> List of Order >> Click on your purchase Domain Name

Add BigRock Domain Name For Blogger Custom Domain


3. Now click on DNS Management.

Add BigRock Domain Name For Blogger Custom Domain


4. Under DNS Management click on Manage DNS.

Add BigRock Domain Name For Blogger Custom Domain

Add A Records and CNAME Records


Add BigRock Domain Name For Blogger Custom Domain


5. Now Under A Records click on Add A Record. Then Enter given data..
  • Host Name: leave it Blank.
  • Destination IPv4 Address: 216.239.32.21
  • TTL: Leave it as it is(28800).
  • Now click Add Record.
Add BigRock Domain Name For Blogger Custom Domain

Now Add 3 More A Records by following IPs.
Second A Record: 216.239.34.21
Third A Record: 216.239.36.21
Fourth A Record: 216.239.38.21 
  • TTL: Leave it as it is for all above IPSs.
6. Now add click CNAME Records >> Add CNAME Record.
Add BigRock Domain Name For Blogger Custom Domain


7. Add the following data.
  • Host Name: leave it Blank.
  • Value: ghs.google.com
  • TTL: Leave it as it is(28800).
Add BigRock Domain Name For Blogger Custom Domain

8. For domain name varification you need to add another CNAME Record which will given in your blogger account.

Setting In Blogger Account

9.Go to blogger Dashboard and hit on Settings >> Basic. Under Publishing at blog address click on add custom domain.

Add BigRock Domain Name For Blogger Custom Domain

Then Click Switch to advanced settings.

Add BigRock Domain Name For Blogger Custom Domain

10. In Advance Setting Enter your full domain name that is www.yoursite.com. But before saving you need your another CNAME Rcord. So click on settings instructions.

Add BigRock Domain Name For Blogger Custom Domain


11. Click on On a top-level domain (www.example.com).
 Below this you can get your second CNAME Record Value like 
"gv-XXXXXXXXXXXXXXXXXXXXXXXXXXXXX.domainverify.googlehosted.com." . So add second CNAME by using step 6 method.
Add BigRock Domain Name For Blogger Custom Domain

12. Finally repeat step 9 and 10. This time Click on Save.

Remember: When you try to save your blogger settings if there is an error shows, then don't worry.After 1 hour or more of your domain account setting[adding all CNAME and A Records] completes, you can apply your blogger setting.

If you have problems then please comment

Tuesday, 1 January 2013

Add Author Information Box Below Every Post To Blogger

Add Author Box Below Every Post To Blogger

         Author Box is a important widget for Blogger or Website holder. Having an author box is very important, because people love to know about the person behind the blog. It will also help those bloggers who have more than one authors writing for their blogs. An author box can include information such as the author's name, a short biography about the author and a small thumbnail picture of the author. You have seen
About Author Box in my blog below every post.


How Author box looks like

It looks like below image:
Add Author Box Below Every Post To Blogger

Add Author Box Below Every Post ~ Blogger

  1. First Log in to your blogger account and go to Template >> Edit HTML >> Check Expand Widget Templates. 
  2. Now Find the below code [Use Ctrl+F to find]:

    ]]></b:skin>
    Just above it paste the following codes:

    .author-box p {
    margin: 0;
    padding: 0;
    }
    .author-box img {
    background: #FFFFFF;
    float: left;
    margin: 0 10px 0 0;
    padding: 4px;
    border: 1px solid #E6E6E6;
    }
  3. Now search for the given code:

    <div class='post-footer-line post-footer-line-1'/>
    Just below it paste the codes given below:

    <b:if cond='data:blog.pageType == &quot;item&quot;'>

    <div class='author-box'>

    <p><img alt='' class='avatar avatar-70 photo' height='70' src='Your Image Link' width='70'/><b>About the Author</b><br/>

    <div style='text-align: justify; font-family: verdana; color: rgb(0, 0, 0);'> Write Something About Yourself <br/>


    Connect Him on <a href='https://plus.google.com/Your Google Plus ID'>Google Plus</a> And <a href='https://www.facebook.com/Username'>Facebook</a>

    <p style='margin:-8px 0'><br/><center>

    <a href='http://www.mybesttricks.com/2013/01/add-author-information-box-below-every.html' style='text-decoration:none;font-size:70%;'>Get This</a></center>
    </p></div></p>

    </div>

    </b:if>
    Change the Blue lines in above code.
    Your Image Link, Write Something About Yourself, Your Google Plus ID, Username
  4. Before you save your template check preview. And then Save your template.

You have done all. Comment & Rate.

Monday, 24 December 2012

Blog has been removed ! What to do next?

Blog has been removed ! What to do next?

Blog has been removed.
Sorry, the blog at example.blogspot.com has been removed. This address is not available for new blogs.
      I saw the above lines, when one of my blog has removed by blogger support for "Spam Host" (Hacking or Pron). I was very sad, don't know what to do? Finally I got a way to get back my hard works. Because I was sure about that my content is pure and deals with my own copyright. I search internet and felt that many bloggers don't know what to do next??


So what to do next??

  • First go to Google Product Forum-Blogger Section .
  • Post a question for your problem. In your question body request for Review.[Enclose with your blog link] .
  • I made a screenshot for my appeal[image below].
     Blog has been removed ! What to do next?
  • After that any of  Blogger Top Contributor will reply your question. If you want a review, just tell him as a owner of your blog.
  • If you are the copyright owner, he will forward your request to Blogger Support.
  • Finally you have to wait for some days as blogger support team will review your blog. And if they found that your blog follows the "Spam Guidelines", they will recover your blog again.

If anything you want to know then comment!!!!

Add Recent Comments Widget With Avatar For Blogger & Blogspot

Add Recent Comments Widget With Avatar For Blogger & Blogspot
                     
This is the tutorial for adding Recent Comment with Avatar Widget to your blogger or blogspot blogs. This is a simple method, adding some html codes to your blog layout. This is a popular widget which increases your visitors comments. This widget looks like above image.


First Go to your blogger Dashboard

  1. Go to your Blogger Dashboard >> Layout >> Add a Gadget >> HTML/JavaScript

Add this HTML/JavaScript code


  1. Add this Code to HTML/JavaScript Box and Name Recent Comments.

    <style type="text/css">
    ul.w2b_recent_comments {
    list-style: none;
    margin: 0;
    padding: 0;
    }

    .w2b_recent_comments li {
    background: none !important;
    margin: 0 0 6px !important;
    padding: 0 0 6px 0 !important;
    display: block;
    clear: both;
    overflow: hidden;
    list-style: none;
    }

    .w2b_recent_comments li .avatarImage {
    padding: 3px;
    background: #fefefe;
    -webkit-box-shadow: 0 1px 1px #ccc;
    -moz-box-shadow: 0 1px 1px #ccc;
    box-shadow: 0 1px 1px #ccc;
    float: left;
    margin: 0 6px 0 0;
    position: relative;
    overflow: hidden;
    }
    .avatarRound {
    -webkit-border-radius: 100px;
    -moz-border-radius: 100px;
    border-radius: 100px;
    }
    .w2b_recent_comments li img {
    padding: 0px;
    position: relative;
    overflow: hidden;
    display: block;
    }
    .w2b_recent_comments li span {
    margin-top: 4px;
    color: #666;
    display: block;
    font-size: 12px;
    font-style: italic;
    line-height: 1.4;
    }
    </style>
    <script type="text/javascript">
    //<![CDATA[
    // Recent Comments Settings
    var
    numComments =
    5,
    showAvatar = true,
    avatarSize = 60,
    roundAvatar = true,
    characters = 40,
    showMorelink = false,
    moreLinktext = "More »",
    defaultAvatar = "
    http://www.gravatar.com/avatar/?d=mm",
    hideCredits = true;
    //]]>
    </script>
    <script type="text/javascript" src="http://helplogger.googlecode.com/svn/trunk/w2b recent comments with avatars.js"></script>
    <script type="text/javascript" src="
    http://your-blog.blogspot.com/feeds/comments/default?alt=json&callback=w2b_recent_comments&max-results=5"></script>

  • Change http://your-blog.blogspot.com with your blog address.
  • Replace the value 5 for numComments = 5, and max-results=5  with the number of comments that you want.
  • Change your Anonymous avatar by changing http://www.gravatar.com/avatar/?d=mm.


You have complete all! Success or Not ???


Saturday, 15 December 2012

Two New Stylish Floating Facebook Like Box For Blogger

Two New Stylish Floating Facebook Like Box For Blogger

                     We all know Facebook is a high rated social media. Facebook having millions of visitor and getting billions of hits every day. Facebook page of a blog is one of important part for increasing blog traffic. Facebook likes brings you maximum number of visitors and increasing your pageviwes for the new posts. I will give you some stylish floating Facebook Like boxes for your blogger blog.

First add  J-Query code

  • Go to blogger Dashboard >>  Template >> Edit html.
  • Search for </head> and just above it paste the following JQuery code, (You can ignore this step if Jquery Link is already added in your template).

    <script type="text/javascript" src="https://ajax.googleapis.com/ajax/libs/jquery/1.6.1/jquery.min.js"></script>

How to add the html codes?

  • Go to your blogger Dashboard >> Layout >> add a gadget >> HTML/JavaScript
  • Paste the following codes.

Style 1:


Two New Stylish Floating Facebook Like Box For Blogger

Code 1:

<script type="text/javascript">
/*<![CDATA[*/
jQuery(document).ready(function() {jQuery(".abtlikebox").hover(function() {jQuery(this).stop().animate({right: "0"}, "medium");}, function() {jQuery(this).stop().animate({right: "-250"}, "medium");}, 500);});
/*]]>*/
</script>
<style type="text/css">
.abtlikebox{background: url("https://blogger.googleusercontent.com/img/b/R29vZ2xl/AVvXsEg4C33hvo9seiPy2YAkbtL6qWtyhkLcmxmijuq87gLUNIgwublBRVIJ4fX-1scM92dV1ws_hxEGHsQIzqkbSYikQEwv89FlCvubXSu8NYwJJocYtwyzeqdFe6C8iOy9_tkNTPYatb2oZiI/s320/fb1-right.png") no-repeat scroll left center transparent !important; float: right;height: 270px;padding: 0 5px 0 46px;width: 245px;z-index: 99999;position:fixed;right:-250px;top:20%;}
.abtlikebox div{ padding: 0; margin-right:-8px; border:4px solid #3b5998; background:#fafafa;}
.abtlikebox span{bottom: 4px;font: 8px "lucida grande",tahoma,verdana,arial,sans-serif;position: absolute;right: 6px;text-align: right;z-index: 99999;}
.abtlikebox span a{color: gray;text-decoration:none;}
.abtlikebox span a:hover{text-decoration:underline;}
}
</style>
<div class="abtlikebox" style="">
<div>
<iframe src="http://www.facebook.com/plugins/likebox.php?href=http%3A%2F%2Ffacebook.com%2F
mybesttrick&amp;width=245&amp;colorscheme=light&amp;show_faces=true&amp;border_color=white&amp;connections=9&amp;stream=false&amp;header=false&amp;height=270" scrolling="no" frameborder="0" scrolling="no" style="border: white; overflow: hidden; height: 270px; width: 245px;background:#fafafa;"></iframe><span><a href="http://mbt33.blogspot.in/2012/12/two-new-stylish-floating-facebook-like.html" target="_blank">Get This!</a></span></div></div>
</div>
</div>

Style 2:


Two New Stylish Floating Facebook Like Box For Blogger

Code 2:

<script type="text/javascript">
//<!--
$(document).ready(function() {$(".floatinglikebox").hover(function() {$(this).stop().animate({right: "0"}, "medium");}, function() {$(this).stop().animate({right: "-250"}, "medium");}, 500);});
//-->
</script><style type="text/css">
.floatinglikebox{background: url("http://3.bp.blogspot.com/-JWNRbfKNQrk/UEoSI1LN1VI/AAAAAAAAMic/gnuREx219iE/s1600/fblikebox.png") no-repeat scroll left center transparent !important;display: block;float: right;height: 270px;padding: 0 5px 0 40px;width: 245px;z-index: 99999;position:fixed;right:-250px;top:20%;}
.floatinglikebox div{border:none;position:relative;display:block;}
.floatinglikebox span{bottom: 10px;font: 10px tahoma,verdana,arial,sans-serif;position: absolute;right: 6px;text-align: right;z-index: 99999;}
.floatinglikebox span a{color: #808080;text-decoration:none;}
.floatinglikebox span a:hover{text-decoration:underline;}
</style><div class="floatinglikebox" style=""><div><iframe src="//www.facebook.com/plugins/likebox.php?href=http%3A%2F%2Fwww.facebook.com%2F
mybesttrick&width=240&height=320&colorscheme=light&show_faces=true&border_color=%23cccccc&stream=false&header=false&appId=159468740772399" scrolling="no" frameborder="0" style="border:none; overflow:hidden; width:240px; height:320px; background:#fff;" allowtransparency="true"></iframe><span><a href="http://mbt33.blogspot.in/2012/12/two-new-stylish-floating-facebook-like.html" target="_blank">Get This!</a></span></div></div>
  • Replace mybesttrick  from the above code and paste your own Facebook page username.
  • Now Save. Visit  your Blog to see it floating facebook like box at the right side of your webpage.

Need any help?? Comment Please!!!


Saturday, 1 December 2012

Add New Google Plus Followers Widget To Bolgger / Blogspot?

Add New Google Plus Followers Widget To Bolgger / Blogspot?

               Google Introduced New Google Plus Followers Widget To Blogger or Blogspot User. It is user friendly and can really help you in bringing traffic to your blog. You know that Google+'s followers have become very important for a blog in order to get the most traffic from Google.


Google Plus Followers Widget


This widget will tell the world how many people are following you, and will also show them some friendly faces (different for each person). It also has a follow button by default, which lets users follow your Google Plus profile page with a single click. This will help in getting your content across multiple streams, and to reach more readers on a more personal level through your blog.

Just Add This Widget In Easy Steps


  1. First Go to Blogger Home and Cilck Setting & then click Connect To Google+ . After Switch Your Account to Google+ and add your blog as Contributor. Like the below images. If you already done this then skip this step.

    Add New Google Plus Followers Widget To Bolgger / Blogspot?

    Add New Google Plus Followers Widget To Bolgger / Blogspot?

    Add New Google Plus Followers Widget To Bolgger / Blogspot?

  2. Now just go to your blogger DashBoard >> Layout >> Add a Gadget >> Google Plus Followers Gadget >> Save .

    Add New Google Plus Followers Widget To Bolgger / Blogspot?

 This Gadget Looks Like


Add New Google Plus Followers Widget To Bolgger / Blogspot?

So You Are Done. Please Comment !!!!

 
Copyright © 2013 My Best Tricks
Design by RoadStar Rakesh |
    Twitter Facebook Google Plus YouTube