BREAKING
Showing posts with label Tips. Show all posts

Saturday, 18 January 2014

How To Check Your Own Mobile Number For All Operator

How To Check Your Own Mobile Number For All Operator

Today we use different mobile operator connection and more than one SIM card. Sometimes we forgot our mobile number of that particular SIM. I was also unable to check my own Reliance number. I search on internet, but did not find a working result. So I made a list of working procedure and hope it will help others to find his/her own mobile number.

How to find your own mobile number of different service provider in India:

  • Airtel - Dial *121*9# or *282#
  • Aircel- Dial *122*131# or *234*4#
  • BSNL- CALL 164 or *1#
  • Reliance- *1# or *3#
  • Tata Docomo- *#1# or *580# or *1#
  • Vodafone- *111*2#
  • Idea-*#1# or *147*2*3#
  • MTS- SMS 'NUM' to 51230
Thank you for visiting my site, if comment for feedback.

Friday, 18 October 2013

How To Create Bootable USB using PowerISO

How To Create Bootable USB using PowerISO

Hello friends, My name is aladin and  I am the new owner of this blog. Now we can make a bootable USB drive using Power ISO. Sometime we are not able to format our computer with bootable DVD or CD. If you don't have a CD Drive, you can use a bootable USB flash drive. Let discuss how we should make a bootable USB.

  Create Bootable USB Flash Drive Using:
  1. Start PowerISO (Download here).
  2. Insert the USB drive you intend to boot from.
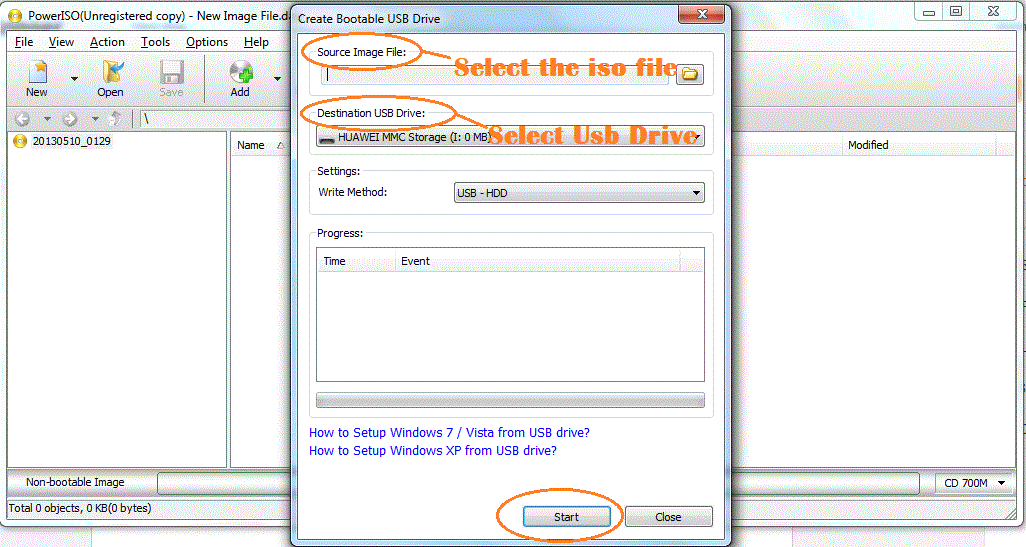
  3. Choose the menu "Tools > Create Bootable USB Drive". The "Create Bootable USB Drive" dialog will popup. If you are using Windows Vista or Windows 7 operating system, you need confirm the UAC dialog to continue.
  4. Now select the "Source Image File" and open the iso file of Windows XP or Windows 7 or Windows 8.
  5. Select the correct USB drive from the "Destination USB Drive" list if multiple USB drives are connected to the computer.
    How To Create Bootable USB using PowerISO

  6. Click "Start" button to start creating windows 7 bootable USB drive.

Thursday, 21 February 2013

How To Remove Locked Widget From Blogger Layout


Today I am sharing a small solution which most of  new blogger friends facing. Sometime we update our blog template for better looking. Then we see some locked widget without remove option in blog layout. The idea is just change the lock mode form true to false by editing at template section. We can also remove the Attribution gadget("Powered By Blogger") using this method.

Widget in your blog layout

  • Go to your blogger Dashboard >> Layout. 
  • To edit the widget just click edit at there.


Lock & Unlock Widget

  • I made a screenshots of above two types of widget. The locked widget don't have remove button.


How to unlock it?

  • Just go to your layout and click edit to get the widget id. You can get the widget id in your browser address bar.

Copy the widget id from widget address bar

  • Now go to Template >> Edit Template. And find the above code.[Use Ctrl+F to find].
  • You will get a line like this <b:widget id='HTML4' locked='true' title='Recent Posts' type='HTML'/> 
  • Change the locked='false'
  • Save your template.

Final step:


  • Now you can easily remove it from your layout. Now the widget shows remove button in your layout.
  • You did all successfully.

Friday, 25 January 2013

Earn Money By File Uploading and Sharing


Today I am sharing a easy way to earn extra money by uploading files. You are running a blog or website contains various downloads[like: Software, Games, Movies]. I suggest you for Tusfiles. Tusfiles.net - Best Free and fast file sharing center. Tusfiles provides an affiliate program which will pay you for complete download, refers, premium sales.


Tusfiles.net ~ Features

  • Free File Sharing.
  • Storage Space upto 50GB.
  • Remote Upload.
  • Resume Downloads.
  • No File Size Limit.
  • File Deleted After 90 Days of Last Download.

@Earn Money ~ An affiliate Program Features

  • Points are given for complete downloads of any file.
  • TusFiles rates Upto $6 for each 1,000 download of your files.
  • Will Pay 10% Of Points Earned By Each User You Refer.
  • We pay monthly, If you request less than $20 we pay you 15th of the month... If you request more than $20 we pay you the 31st of the month.
  • Payments are made via PayPal.

So join now. Upload, share and earn. Click Below Link and Register at Tusfiles earning progarm.


Want to know more~ then comment here


Tuesday, 15 January 2013

Lock Your Computer Folder Without Any Software

Lock Your Computer Folder Without Any Software

Now you can protect your sensitive files and folders without using a software base lock. In order to secure your privacy on your pc, u might need to lock certain folders. Although password protecting software do work, it is almost useless to hide private data with these software(because we are always questioned as to what it is that we are hiding with the help of these software). Hidden folders do not work as they can be easily searched with Windows Search. So, we need an alternative way to create hidden password protected folders which only we can access.


Follow the easy steps


  • It’ll only take a couple of steps and you’re done. The default password is “yourpassword”. This is the only thing you’re gonna change in the code.
  • Copy the below code.

    cls
    @ECHO OFF
    title Folder Locker
    if EXIST "Control Panel.{21EC2020-3AEA-1069-A2DD-08002B30309D}" goto UNLOCK
    if NOT EXIST Locker goto MDCAPRIOFILES
    :CONFIRM
    echo Are you sure to Lock this folder? (Y/N)
    set/p "cho=>"
    if %cho%==Y goto LOCK
    if %cho%==y goto LOCK
    if %cho%==n goto END
    if %cho%==N goto END
    echo Invalid choice.
    goto CONFIRM
    :LOCK
    ren Locker "Control Panel.{21EC2020-3AEA-1069-A2DD-08002B30309D}"
    attrib +h +s "Control Panel.{21EC2020-3AEA-1069-A2DD-08002B30309D}"
    echo Folder locked
    goto End
    :UNLOCK
    echo Enter password to Unlock Your Secure Folder
    set/p "pass=>"
    if NOT %pass%==
    yourpassword goto FAIL
    attrib -h -s "Control Panel.{21EC2020-3AEA-1069-A2DD-08002B30309D}"
    ren "Control Panel.{21EC2020-3AEA-1069-A2DD-08002B30309D}" Locker
    echo Folder Unlocked successfully
    goto End
    :FAIL
    echo Invalid password
    goto end
    :MDCAPRIOFILES
    md Locker
    echo Locker created successfully
    goto End
    :End
  • Save this file as “locker.bat”.
  • Now double click on locker.bat.
  • It will create a folder named Locker with automatic lock. After creation of the folder, place the contents (your files & folders) you want to lock inside the Folder,
  • Double click locker.bat again. It will ask to lock the folder Y/N. If you press y then enter. it will lock the folder and your folder will be hidden.
  • To unlock run locker.bat again, it will ask to enter password, type in correct password then enter, you can see your folder back.
  • Please don’t change anything except password, otherwise this lock may does not work.
Note that: ***The default password is “yourpassword”. This is the only thing you’re gonna change in the code.***


Please comment and share your views

Thursday, 10 January 2013

Dates and Schedule Of VOCLET-2013 & JEXPO-2013 (Polytechnic)

Dates and Schedule Of VOCLET-2013 & JEXPO-2013 (Polytechnic)

       The Entrance Examination of VOCLET-2013 & JEXPO-2013 for entry in Goverment and Self-Financed / Private Polytechnics to be conducted by the West Bengal State Council of Technical Education will be held as per following shedule:


Sl No.           Activites VOCLET-2013  |  JEXPO-2013
1.  Date of Examination        5TH MAY, 2013          |    19TH MAY, 2013
2. Sale of OMR Application Forms from Polytechnic   28th JANUARY,2013 - 25th FEBRUARY.2013
3. Last Date of Submission of filled-in Forms                 27th FEBRUARY, 2013
4. Availability of Aplication Forms with Information Brochure From all Polytechnics affiliated to WBSCTE, other centers in West Bengal and other states as required.
5. Place of submission of duly filled-in Application Forms: To all Polytechnics affiliated to WBSCTE, other centers in West Bengal and other states as required.
6.
Sale of OMR Application Forms from WBSCTE with Late Fee:
    27th FEBRUARY,2013 - 8th MARCH, 2013
7. Last Date of Submission  of filled-in Forms with Late Fee at WBSCTE office                   8th MARCH, 2013
8. Application Fees: * Without Late Fee: Rs. 450/-
* With Late Fee     : Rs. 800/-(Incl. Late Fee Rs.350/-)
9. Eligibility criteria of applicants: *[VOCLET-2013]: Passed/appeared 12th science with
Vocational subjects from WBSCVET or passed 2 years
ITI after 10th class.
*[JEXPO-2013]: Passed 10th standard with at least 35% marks(without additional subject) at the qualify
examination (without rounding-up).
10. Age Criteria : No upper age limit, but candidate's date of birth should
not be after 01.01.1998


***Note that: Above information is collected from a notice published on 10.01.2013 at W.B.S.C.T.E Website.

How To Add Meta Tags To Your Blogger Blog


              A meta tag contains meta data about the web page it is in. A meta tag will not affect the way the page looks, and in most cases won't even be seen by the person reading the web page. But meta data can contain useful information about the page that programs and web spiders can use.


Why use Meta tags?

meta description of my best tricks
Meta Description of this blog
       Adding meta tags is very important if you want to get some good traffic from search engines like google,yahoo,msn,etc,especially the meta description part is the most important one. This is an important factor in Search Engine Optimization (SEO). Meta tags allows search engines to index your blog pages more accurately and correctly.


How to add Meta tags to Blogger?


  • Go to your blogger Dashboard >> Template >> Edit HTML.

    How To Add Meta Tags To Your Blogger Blog

  • Find the following code.(Use Ctrl+F to find).


<b:include data='blog' name='all-head-content'/>
  • Now add below codes just after the above code.
<meta content='DESCRIPTION HERE' name='description'/>
<meta content='KEYWORDS HERE' name='keywords'/>
<meta content='AUTHOR NAME' name='author'/>

    Make change the blue lines as follow
DESCRIPTION HERE - With your shorrt blog description
KEYWORDS-  Write keywords related to your blog
AUTHOR NAME - Write your own Name.
  • Finally Save your template. 

Rate & Comment!!!

Tuesday, 25 December 2012

How to Skip Adf.ly & Adfoc.us Links in UC Browser Opera-mini

How to Skip Adf.ly & Adfocus.us Links in UC Browser Opera-mini

                 Whenever we click download links in websites or blogs, we directed to  adf.ly or adfoc.us ad links. Most of blog owners use adf.ly & adfocus.us for shorten links and earn money. But in mobile browsers (Like Opera mini, Uc Browser) the "Skip Ad" button is not appears. So we can't bypass the ad and get the original link.


?? Solution I Found ??


  • Just Go to this site   http://linkdecrypter.com/ .
  • Paste your adf.ly and adfocus.us link to the box and check the Link-mode. Then click Unprotect.

    How to Skip Adf.ly & Adfocus.us Links in UC Browser Opera-mini
  • Finally You Get the Original link like below image.

    How to Skip Adf.ly & Adfocus.us Links in UC Browser Opera-mini


If works for you then please put a comment !!

Monday, 24 December 2012

Blog has been removed ! What to do next?

Blog has been removed ! What to do next?

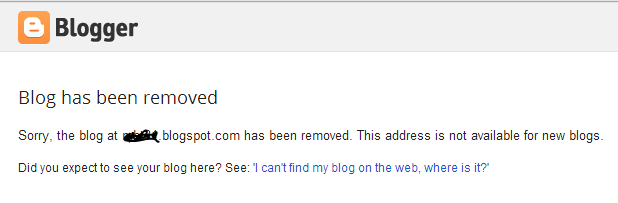
Blog has been removed.
Sorry, the blog at example.blogspot.com has been removed. This address is not available for new blogs.
      I saw the above lines, when one of my blog has removed by blogger support for "Spam Host" (Hacking or Pron). I was very sad, don't know what to do? Finally I got a way to get back my hard works. Because I was sure about that my content is pure and deals with my own copyright. I search internet and felt that many bloggers don't know what to do next??


So what to do next??

  • First go to Google Product Forum-Blogger Section .
  • Post a question for your problem. In your question body request for Review.[Enclose with your blog link] .
  • I made a screenshot for my appeal[image below].
     Blog has been removed ! What to do next?
  • After that any of  Blogger Top Contributor will reply your question. If you want a review, just tell him as a owner of your blog.
  • If you are the copyright owner, he will forward your request to Blogger Support.
  • Finally you have to wait for some days as blogger support team will review your blog. And if they found that your blog follows the "Spam Guidelines", they will recover your blog again.

If anything you want to know then comment!!!!

Thursday, 20 December 2012

Add a Shutdown Menu To Windows 8 Taskbar

Add a Shutdown Menu To Windows 8 Taskbar

             In Windows 8 Power option is not available in taskbar or in desktop. I just found some easy steps for Power shortcuts (Shutdown, Hibernate, Log Off, Switch User, Lock). The technique involves creating a series of shortcuts using special commands, saving them to a folder, and then specifying that folder as a taskbar toolbar.


Menu option
Command
Shut downshutdown.exe /s /t 00
Restartshutdown.exe /r /t 00
Log offshutdown.exe /l
Sleep or Hibernaterundll32.exe powrprof.dll,SetSuspendState
Lockrundll32.exe user32.dll,LockWorkStation
Switch usertsdiscon.exe

Easy Steps:


  1. First make a New Folder and rename it with "Shutdown". 
  2. Make a new shortcut in Shutdown folder. Add the above command at "Type the location of the item" field and name the shortcut as "Shutdown". Follow below image.

    Add a Shutdown Menu To Windows 8 Taskbar

    Add a Shutdown Menu To Windows 8 Taskbar
  3. Now create the other shortcuts for Restart, Hibernate, Log Off etc. In order to use the taskbar toolbar, you’ll need to create all your shortcuts in Shutdown folder.
  4. Once you created your all shortcuts, now you can add a unique icon for each shortcut. Go to your shortcut Properties, click Change Icon then click the Browse button. You can find a host of icons in the Shell32.dll file, as shown in below images.

    Add a Shutdown Menu To Windows 8 Taskbar

  5. Now you have create a toolbar in your taskbar. Right-click on the taskbar and then select the Toolbars >> New toolbar >>Choose a folder dialog box and will need to locate and select the Shutdown folder. Your new Shut down menu will now appear on the right edge of the taskbar.


    Add a Shutdown Menu To Windows 8 Taskbar


Source:


TechRepublic [By Greg Shultz]


Comment Please!!!!

Sunday, 9 December 2012

Install Broadcom Dell Wireless 365 Bluetooth Module Application On Windows 8

Install Broadcom Dell Wireless 365 Bluetooth Module Application On Windows 8
   
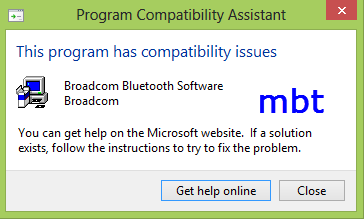
                When I first install Windows 8 in my laptop, I faced problem with my Bluetooth driver. When I tried to install Dell Wireless 365 Bluetooth Module Application in my lappy it shows error likes Program Compatibility Issue . Error screeshot like below picture.


Install Broadcom Dell Wireless 365 Bluetooth Module Application On Windows 8

Solution:
  • Go to the extracted files in C Drive >> dell >> drivers >> R226746 >>Win32/ Win64.
  • In Win32/Win64 folder run inst.exe as administrator.
  • This installed your driver successfully.
  • I had made a screenshot below. Please comment.

Install Broadcom Dell Wireless 365 Bluetooth Module Application On Windows 8


Saturday, 1 December 2012

Add New Google Plus Followers Widget To Bolgger / Blogspot?

Add New Google Plus Followers Widget To Bolgger / Blogspot?

               Google Introduced New Google Plus Followers Widget To Blogger or Blogspot User. It is user friendly and can really help you in bringing traffic to your blog. You know that Google+'s followers have become very important for a blog in order to get the most traffic from Google.


Google Plus Followers Widget


This widget will tell the world how many people are following you, and will also show them some friendly faces (different for each person). It also has a follow button by default, which lets users follow your Google Plus profile page with a single click. This will help in getting your content across multiple streams, and to reach more readers on a more personal level through your blog.

Just Add This Widget In Easy Steps


  1. First Go to Blogger Home and Cilck Setting & then click Connect To Google+ . After Switch Your Account to Google+ and add your blog as Contributor. Like the below images. If you already done this then skip this step.

    Add New Google Plus Followers Widget To Bolgger / Blogspot?

    Add New Google Plus Followers Widget To Bolgger / Blogspot?

    Add New Google Plus Followers Widget To Bolgger / Blogspot?

  2. Now just go to your blogger DashBoard >> Layout >> Add a Gadget >> Google Plus Followers Gadget >> Save .

    Add New Google Plus Followers Widget To Bolgger / Blogspot?

 This Gadget Looks Like


Add New Google Plus Followers Widget To Bolgger / Blogspot?

So You Are Done. Please Comment !!!!

Friday, 30 November 2012

How To Download Torrent Files Using Internet Download Manager

How To Download Torrent Files Using Internet Download Manager

                   Hello Friends. I am Rakesh Ali. Now we can download torrents files using Internet Download Manger. Zbigz provide direct download links for any torrent links. Just you need to follow some steps.
  1. First go to any torrent site like extratorrent.com, kat.ph etc. and copy the Magnet Link.

    How To Download Torrent Files Using Internet Download Manager

  2. Now Go to www.zbigz.com .
  3. Then paste the magnet link and click Go!
    How To Download Torrent Files Using Internet Download Manager


                     You are done. Please comment if it works for you or have any problem. And Please share this post to your friends. Be smart. And thank you very much for visit our blog.
 
Copyright © 2013 My Best Tricks
Design by RoadStar Rakesh |
    Twitter Facebook Google Plus YouTube